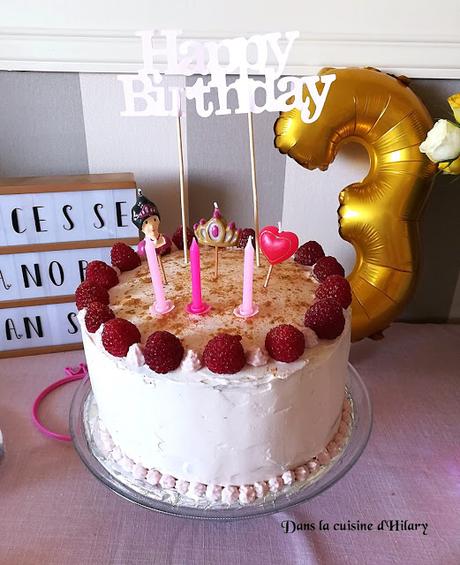
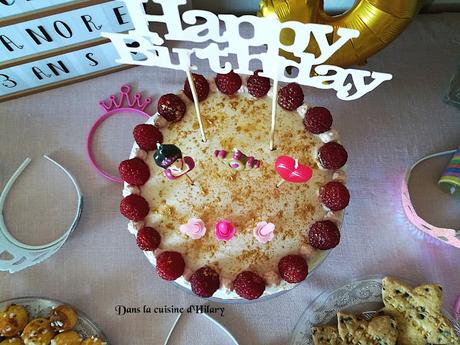
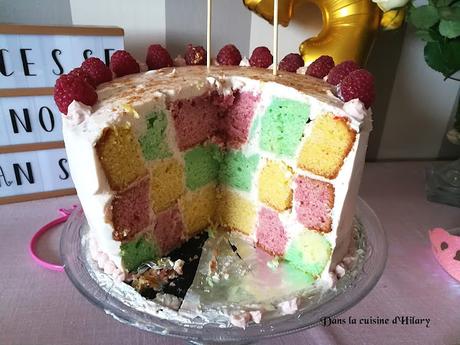
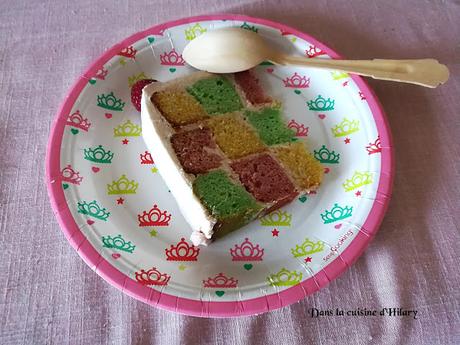
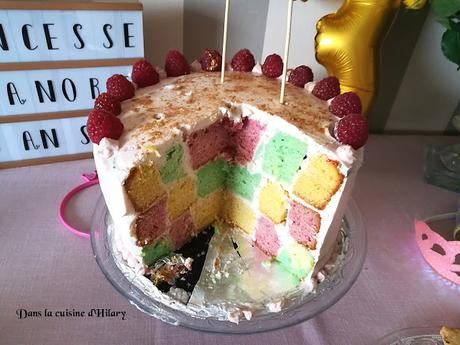
 Comme vous avez pu le voir la semaine dernière, nous avons célébré il y a peu l'anniversaire de notre petite Princesse... Et qui dit anniversaire, dit gâteau d'anniversaire! J'adore faire son gâteau d'anniversaire et voir ses petits yeux pleins d'étoiles lorsqu'on lui apporte avec les bougies allumées, surtout qu'ici les bougies étaient des bougies de princesse... Je crois qu'elle a rarement été aussi impatiente de manger son gâteau d'anniversaire, car pendant tout le mois de septembre elle me demandait, "quand est-ce que je vais avoir mon gâteau de princesse"... Alors avec tant de pression, il fallait aussi bluffer à l'intérieur, c'est pour cette raison que j'ai choisi de faire un gâteau damier aux trois parfums (et assortit aux couleurs de son anniversaire!!).
Cela semble compliquer à réaliser, pourtant il n'en est rien, il fut facile à faire et même si j'ai eu quelques frayeurs au moment de sa "construction", j'ai été complètement satisfaite au moment du découpage et en plus de cela, il était vraiment bon, des gâteaux légers et fruités (j'ai utilisé un sponge cake) et un bon glaçage à la framboise...
Mon astuce: j'ai choisi de ne pas colorer davantage le glaçage et de laisser la couleur naturelle du coulis de framboise, mais vous pouvez ajouter du colorant!
Ingrédients (pour 12 à 15 personnes voir plus): Pour la pâte des gâteaux:-550g de sucre-525g de farine-330g de beurre mou -45ml de lait-6 œufs-1,5 sachets de levure chimique-1,5 cuillères à café de selPour aromatiser les gâteaux-1 1/2 citron non traité-25ml de lait -75g de framboises surgelés-25ml d'eau-1 cuillère à café d'extrait de vanille 400 -colorants gel Scrapcooking® rose, jaune et vert Pour le glaçage:-350g de mascarpone-350g de cream cheese-20cl de crème fleurette
-150g de sucre glace
-100g de coulis de framboise
-100g de framboises fraîches-bougies Princesse Scrapcooking®
-paillettes alimentaires dorées Scrapcooking® Préchauffez le four à 180°C.Dans un saladier, battez le beurre mou avec le sucre et faites le blanchir, il doit devenir léger et crémeux. Ajoutez les œufs un à un en mélangeant entre chaque ajout.Versez progressivement, tout en mélangeant, la farine, la levure, le sel et le lait. Vous devez obtenir un appareil homogène.Divisez le en 3, en pensant afin d'avoir des gâteaux de même poids. Pour le premier gâteau, celui à la framboise, réalisez un coulis de framboise express en faisant cuire les framboises dans l'eau, passez au chinois pour retirer les pépins puis ajoutez dans la pâte et mélangez bien. Si nécessaire, rajoutez une petite goutte de colorant rose. Versez dans le moule de 20cm puis enfournez pour 25 à 30 minutes, surveillez bien la cuisson, la pointe d'un couteau doit ressortir sèche.Pour le deuxième gâteau, celui au citron, ajoutez le zeste d'un citron, 60g de jus de citron frais et le lait. Ajoutez du colorant vert. Versez dans le même moule et opérez comme le premier gâteau pour la cuisson.Pour le troisième gâteau, celui à la vanille, ajoutez l'extrait de vanille, mélangez. Colorez avec du colorant jaune. Versez dans le même moule et opérez comme les deux autres gâteaux. A la sortie du four, laissez refroidir les gâteaux complètement sur une grille.Pendant ce temps, préparez le glaçage. Battez ensemble le mascarpone et le cream cheese puis ajoutez-y le sucre glace et le coulis de framboise. Montez la crème fleurette en chantilly puis ajoutez-la délicatement au mélange précédent. Réservez au frais. Maintenant, il s'agit de monter le damier. Cela peut paraître difficile mais il n'en est rien, il vous suffit de prendre des cercles de 7cm et 13cm (à 1cm près). D'abord, commencez par retirer le haut de chaque gâteau avec un grand couteau afin d'obtenir un gâteau droit, propre et net. Par la même occasion, vérifiez que vos gâteaux fassent bien la même hauteur. Puis découpez dans chaque gâteau, un cercle de 7cm et un autre de 13cm. Séparez-les délicatement puis faites les associations suivantes sans pour autant les encastrer:-grand cercle vert, moyen cercle rose, petit cercle jaune-grand cercle rose, moyen cercle jaune, petit cercle vert-grand cercle jaune, moyen cercle vert, petit cercle roseMaintenant vous allez pouvoir former le gâteau. Commencez par prendre une semelle à gâteau sur laquelle vous placez un peu de glaçage pour fixer les gâteaux. Placez le grand cercle vert et mettez à l'intérieur un peu de glaçage puis "collez" le moyen cercle rose, mettez à nouveau du glaçage à l'intérieur et terminez en positionnant le petit cercle jaune. Couvrez d'une fine couche de glaçage et surmontez avec les autres gâteaux avec lesquels vous procéderez de la même façon pour chaque étage. Lorsque c'est bon, couvrez d'une fine couche de glaçage qui aura pour but d'accrocher les miettes en lissant bien avec une spatule. Placez au frais pour au moins une heure afin que tout durcisse. Replacez également le glaçage au frais. Après une heure, utilisez le reste de glaçage (gardez en l'équivalent de 4 cuillères à soupe pour la décoration) afin de couvrir uniformément tout le gâteau en lissant au maximum avec l'aide de la spatule. Dès que le glaçage commence à devenir difficile à appliquer, replacez quelques minutes l'ensemble au frais.Placez la fin du glaçage dans une poche à douille avec une fine douille cannelée, décorez le bas du gâteau et le haut en faisant des petites pointes de glaçage. Pour le haut du gâteau, alternez les pointes de glaçage avec des framboises fraiches, décorez le reste selon vos préférences (ici paillettes dorées en plus).Placez au frais jusqu'au moment de servir!
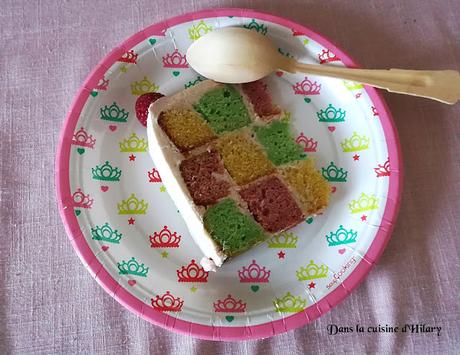 As you may have seen last week, we celebrated our little princess's birthday... And when you say birthday, you think birthday cake! I love baking her birthday cake, just to see her little eyes wide open as soon as she sees the candles, especially since these candles were made for princesses! I think it was really the first time that she was so impatient for her birthday cake, she asked for it all the time! So I had to make something as pretty outside as it was inside, that's why I've decided to make a checkerboard cake with 3 different flavors (and color coordinated with her birthday decoration!).
It might seem difficult to make, but actually, you'll see that it isn't! And even though I was a little scared at first, I was really satisfied with the final result, it was also delicious with light fruity sponge cakes and a raspberry icing....
My advice: I didn't color the icing to only have the natural color of the raspberry purée but you can add color if you prefer!
Ingredients (for 12 to 15 persons, or more):
For the cakes:
-2 3/4 cups of sugar
-4 1/3 cups of flour
-1 1/3 cups of softened butter
-1 3/4 cups of milk
-6 eggs
-3 teaspoons of baking powder
-1,5 teaspoons of salt
To season the cakes:
-1, 1/2 lemon
-1 cup of milk
-2,5 oz. of raspberries
-1 cup of water
-1 teaspoon of vanilla extract
-pink, green and yellow food coloring
For the icing:
-12 oz. of mascarpone-12 oz. of cream cheese-1 cup of liquid cream-1, 1/2 cups of icing sugar
-3,5 oz. of raspberry coulis
-3,5 oz. of fresh raspberries
Preheat the oven at 350°F.
In a salad bowl, beat the softened butter with the sugar until it whitens, it must be light and creamy. Add the eggs one by one, whisking between each addition.
Pour progressively, while beating, the flour, the baking powder, the salt and the milk. You must obtain a homgeneous batter.
Divide the dough in 3 by weighting the dough to obtain same weight cakes.
For the first cake, the raspberry one, make a raspberry coulis by cooing the raspberries in the water, removes the seeds and add to the dough. If necessary, add a little bit of pink coloring. Pour into a 20cm diameter mould and cook for 25 to 30 minutes, checking the cooking, when it's cooked, the knife must be dry.
For the second cake, the lemon one, add the lemon zest and 2 oz. of fresh lemon juice and the milk. Add green coloring. Pour into the same mould and do the same thing as the first cake.
For the third cake, the vanilla one, add the vanilla extract, stir. Color with yellow coloring. Pour into the same mould, and cook like the first two cakes.
Once there are out of the oven, let the cake cool on a grill.
Meanwhile prepare the icing, beat the mascarpone and the cream cheese and add the icing sugar and the raspberry coulis. Whisk the liquid cream into a firm chantilly and add delicately to the previous batter. Let it set in the fridge.
Now, it's time to make the checkerboard cake... It might seem difficult, but it's not, you just have to take circles of 7cm and 13cm (more or less). First, start by removing the top of each cake with a big knife to obtain a straight and neat cake, and measure so the 3 cakes are at the same height. Then, cut in each cake, a circle of 7cm and another one of 13cm. Separate them carefully and make the following associations:
-big green circle, middle pink circle, small yellow circle
-big pink circle, middle yellow circle, small green circle
-big yellow circle, middle green circl, small pink circle
Now you can shape the cake. Start by putting a little bit of icing on your cake plate, so you can fix the cakes. Put the first big green circle and put some icing inside to "glue" the middle pink circle, but a little bit of icing in this pink circle to "glue" the small yellow circle. Cover with a thin layer of icing and top with the other cakes, doing the same operation for each layer. Once the cake is done, cover it completely with a thin layer of icing, and smooth it as much as possible with a spatula (the goal is to catch the crumbs). Put in the fridge for 1 hour so it can harden. After one hour, use the rest of the icing (but keep 4 tablespoons aside for the decoration) to cover all the cake, smoothing it as much as possible with a spatula. As soon as the icing is hard to work with, put back in the fridge.
Put the rest of the icing in a pastry bag, decorate the bottom of the cake (like little pearls) and the top too. For the top of the cake, let enough space to put a raspberry between each icing decoration, decorate the rest of the cake as you prefer.
Put in the fridge until you serve!
